
Home insulation tips: save on bills with high-impact steps
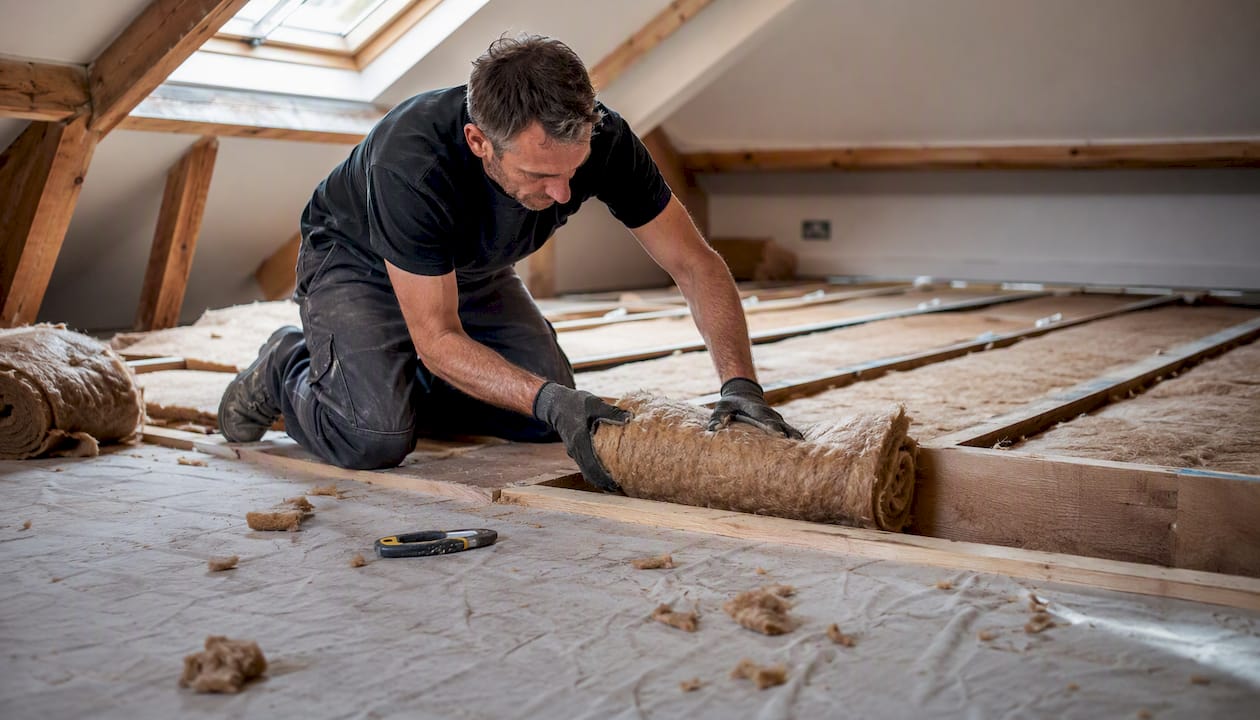
Three moves cut most of the heat loss from a typical home: topping up loft insulation to the right depth, sealing draughts around doors, windows and floor gaps, and insulating the hot water tank and pipes. Together, insulation and air sealing can reduce total energy costs by around 11% on average, with the loft usually giving you the fastest return.
Here’s the shortlist worth acting on this week:
Check your loft depth. Anything under the equivalent of R-30 is worth topping up, and it’s one of the few jobs a confident DIYer can finish in a weekend.
Seal the big gaps first. Loft hatches, pipe penetrations and gaps around window and door frames leak more heat than most people realise. Sealing before insulating stops warm air bypassing your new material.
Wrap the hot water cylinder and pipes. A jacket and some pipe lagging cost very little and pay back within months.
Fit draught excluders on external doors and check for gaps around letterboxes and skirting boards.
Do just one thing today: grab a torch, head into the loft, and measure how deep your insulation actually is.
Key Takeaways
Cutting heat loss effectively means sealing air leaks first, insulating the loft to at least R-30, and treating moisture control as non-negotiable in every retrofit.
Point | Details |
Start with the loft | Top up insulation below the R-30 equivalent for the fastest payback of any measure. |
Seal before you insulate | Air sealing gaps first stops warm air bypassing new insulation entirely. |
Insulate the hot water system | A tank jacket and pipe lagging cost little and repay themselves within months. |
Match materials to moisture risk | Choose rigid foam boards over fibreglass in damp-prone basements and solid walls. |
Plan insulation into bigger projects | Combine insulation with an extension or loft conversion while walls are already open. |
Table of Contents
Home insulation tips start with understanding how your house loses heat
Heat always moves from warm to cold, and your home is constantly losing warmth through five main paths: the roof, external walls, floors, windows and doors, and gaps where air moves uncontrolled through the building. Insulation slows that transfer, measured by R-value (higher is better) or its inverse, U-value (lower is better). But insulation alone won’t stop airflow. Warm air bypasses even thick insulation if there are gaps for it to escape through, which is why air sealing has to come first or alongside any insulation upgrade.
A few quick diagnostics tell you where to start:
Feel internal walls and floors on a cold day. If they’re noticeably chilly compared with the air temperature, heat is escaping through them.
Notice which rooms run cold no matter how high you turn the heating. That’s often a sign of poor insulation or draughts in that specific area.
Watch for ice dams on the roof edge in winter. They point to heat escaping through the loft and melting snow unevenly.
Switch off lights, hold a torch near electrical sockets and switch plates on external walls, and look for shadows that suggest gaps behind the fitting.
Persistently high energy bills, damp patches, or cold surfaces are all classic signs your home needs better insulation.
If several of these show up at once, it’s worth booking a proper home energy assessment, including a blower-door or thermographic test, before spending money on materials.
Prioritised room-by-room insulation: what to tackle first
Not every part of the house deserves equal attention. Some jobs pay back in months; others take years. Here’s how to rank them.
Attic and loft. This is almost always where to start. If your insulation is thinner than the equivalent of R-30, roughly 10 to 13 inches depending on material, topping it up delivers the quickest payback of any insulation job. Keep soffit vents clear so the roof space can still breathe, and insulate the loft hatch itself, which is often overlooked entirely. Rolling out mineral wool between and over the joists is a genuinely achievable DIY task for most homeowners; our loft insulation workflow walks through it step by step.
Cavity walls. If your home was built with a gap between two layers of brick, typically anything from the 1920s onwards, cavity wall insulation can be effective and relatively low disruption. It’s not always appropriate, though. Homes exposed to driving rain, or with existing damp issues, are poor candidates because filled cavities can let moisture bridge from the outer to the inner wall. Get a survey before committing.
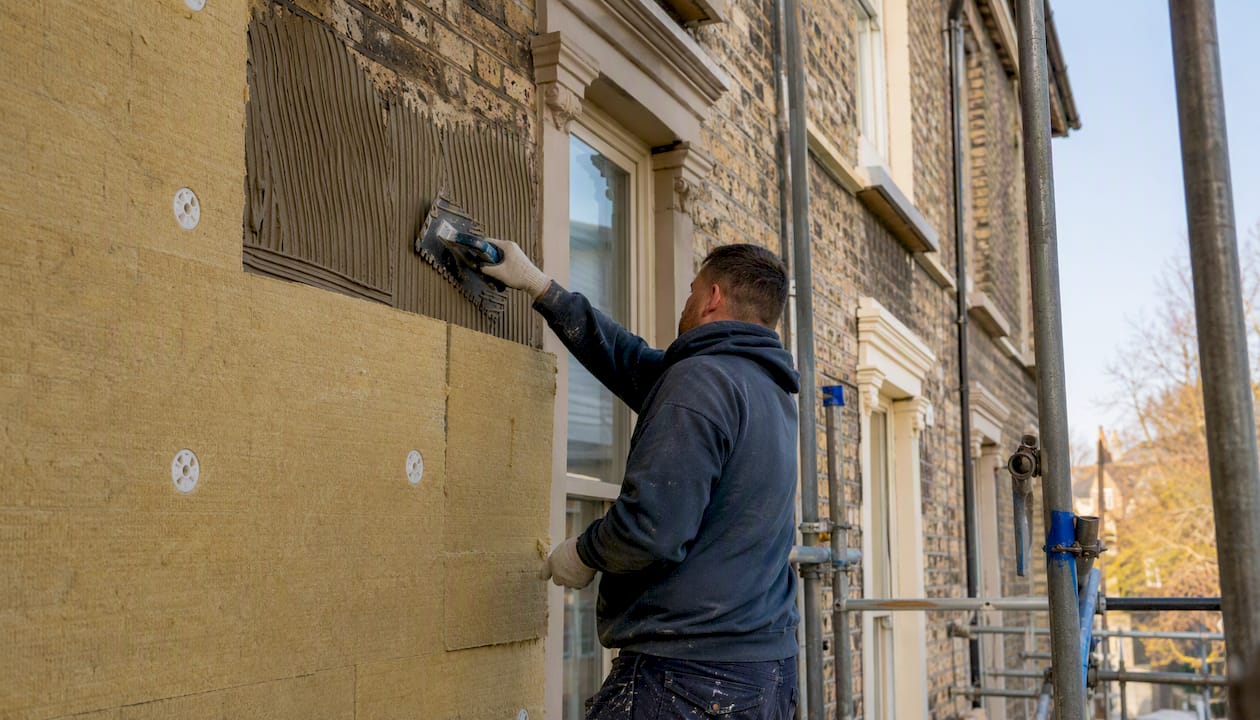
Solid walls. Period properties in London, particularly in areas like Chiswick and Kensington, often have solid brick walls with no cavity to fill. Here you’re choosing between internal wall insulation (cheaper, but eats into room space and disrupts existing rooms) and external wall insulation (more expensive, more disruptive to install, but preserves internal floor area and improves the building’s weatherproofing). External work usually needs planning consideration on period or conservation-area properties.
Floors, basements and crawlspaces. Suspended timber floors benefit from insulation between the joists; solid concrete floors are trickier and usually only worth upgrading during a larger refurbishment. Basements and crawlspaces need a moisture check before any insulation goes in, since trapping damp behind new material causes far more damage than the cold it was meant to fix.
Heating components. Insulating the hot water tank, lagging exposed pipework, and fitting thermostatic radiator valves are small jobs with outsized impact. A tank jacket alone can cut standing heat loss significantly for the cost of a takeaway.
Which insulation materials work best, and what R-value to expect
Material choice depends on where you’re insulating and how much space you’ve got to work with. Here’s how the common options compare on performance per inch:
Material | R-value per inch | Best used for |
Spray foam | R-6.0 | Air-sealing irregular gaps, rim joists, tight cavities |
Polyiso rigid board | R-5.0 | Thin wall build-ups where space is limited |
Fibreglass | R-3.0 | Loft rolls, stud walls, cost-effective bulk insulation |
Mineral wool | R-3.1 | Lofts, cavity walls, fire-resistant applications |
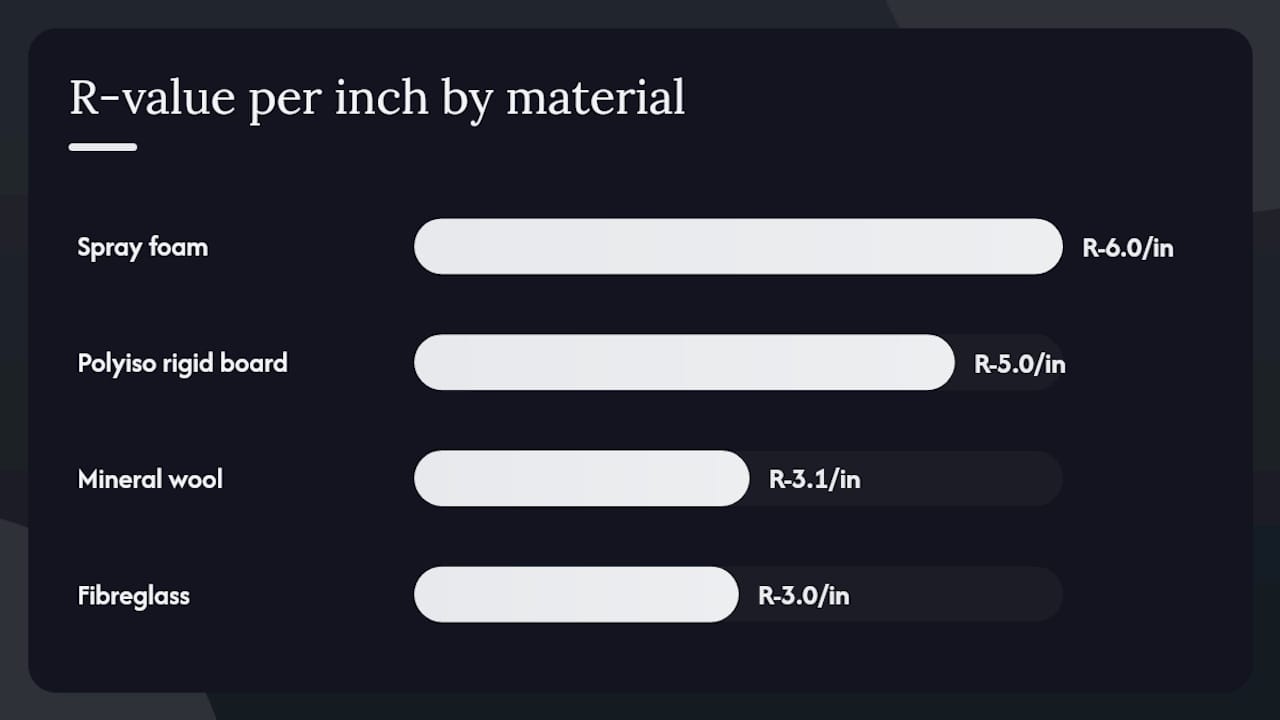
These R-value ranges mean spray foam and polyiso do more work per inch of thickness, which matters most where you’re insulating internal walls and can’t afford to lose much floor space. Fibreglass and mineral wool are cheaper per unit of coverage and remain the standard choice for lofts, where thickness is rarely a constraint.
A few practical notes worth remembering:
In damp-prone areas like basements or solid wall cavities, choose materials with better moisture tolerance, such as rigid foam boards, over fibreglass, which loses much of its insulating value when wet.
Mineral wool has a genuine edge on fire resistance, worth considering around chimneys, flues or shared party walls in terraced housing.
Cellulose, often made from recycled newspaper, and boards using reduced-impact blowing agents are worth asking about if environmental footprint matters to you. Ask your supplier directly about recycled content and the blowing agent used, since this varies considerably between manufacturers.
What you can safely DIY, and when to call in a professional
Plenty of insulation work is genuinely within reach for a competent homeowner. Rolling loft insulation between joists, draught-proofing doors and windows with strips or brushes, fitting a hot water tank jacket, lagging exposed pipes, and adding basic batts around a rim joist are all manageable weekend projects with basic tools.
Other jobs need a professional, and not just for convenience:
External or internal solid wall insulation, where getting the vapour control wrong causes long-term structural damage.
Full cavity wall fills, which require specialist equipment and a proper pre-installation survey.
Spray foam installation, which needs correct ventilation during application and professional-grade equipment.
Any insulation work bound up with a loft conversion, where ventilation, fire safety and structural changes all interact.
Before hiring anyone, ask a short list of direct questions: do they offer a blower-door test as part of the survey, can they provide references from similar local jobs, will the work come with a written warranty, are they properly insured, and does the quote include waste removal? A proper home energy assessment before major work starts is standard practice among reputable contractors, not an optional extra.
What does home insulation cost, and how fast does it pay back?
Costs vary a lot by property size and existing condition, but the pattern is consistent: cheaper measures tend to pay back fastest. A loft top-up is usually the best value job in the house, often paying for itself within a couple of heating seasons through lower bills. Cavity wall fill costs more upfront but still tends to repay itself within a handful of years for a typical semi-detached home. Internal wall insulation on solid walls costs considerably more and disrupts living space, so it makes most financial sense when bundled into a wider refurbishment rather than done as a standalone job.
Measure | Typical payback speed |
Loft top-up | Often repays within a few years |
Hot water tank and pipe insulation | Very fast, often under a year |
Cavity wall insulation | Moderate, several years |
Internal or external solid wall insulation | Slowest, best combined with other renovation work |
Insulation plus air sealing can bring total energy costs down by around 11% on average, with attic work delivering the strongest single return. If you’re weighing up whether a scheme or grant might help with costs, check current government energy efficiency pages directly rather than relying on a contractor’s word for eligibility, since criteria change often.
Weekend fixes that make an immediate difference
You don’t need scaffolding or a skip to start feeling the benefit. A single free Saturday can knock out most of the following:
Fit draught excluders and brush strips around external doors, letterboxes and skirting board gaps.
Check loft insulation depth with a tape measure and top up thin patches, especially near the eaves.
Insulate the loft hatch itself with a simple foam-backed cover.
Fit a jacket on the hot water cylinder and lag any exposed pipework in the loft or under floors.
Install thermostatic radiator valves so rooms you use less often don’t get overheated unnecessarily.
Pro Tip: Rank your weekend jobs by cost per degree of comfort gained, not by how satisfying they feel to do. A £15 tank jacket often beats a £150 secondary glazing panel on pure payback speed.
Common mistakes that cause damp, mould and wasted money
Adding insulation without thinking about air sealing and ventilation is the single most common error homeowners make, and it can turn a comfort upgrade into a moisture problem. Warm, humid indoor air meets a colder surface inside the wall or roof structure and condenses there, a phenomenon known as interstitial condensation. This is a particular risk in basements, solid walls and poorly ventilated lofts.
Other frequent slip-ups include blocking soffit vents when adding loft insulation (starving the roof space of the airflow it needs), compressing fibreglass batts to fit them into a space that’s too small (which reduces their effective R-value), and skipping vapour control layers where the building genuinely needs one. Correct ventilation and vapour barriers matter most in basements, crawlspaces and solid wall retrofits.
Pro Tip: Musty smells, peeling paint, or a dark tide mark near a skirting board are early warning signs of trapped moisture. Address the ventilation and air-sealing detail immediately rather than adding more insulation on top of the problem.
How insulation fits into a bigger renovation project
Insulation rarely works best as an isolated job. The best results come from thinking about it at the same time as any structural work, because once a wall or loft is opened up during an extension or refurbishment, that’s the cheapest moment to get insulation and air sealing right.
Sequencing matters more than most homeowners expect. Air sealing and thermal boundary design need to be planned early in a build programme, then executed while walls, floors or the loft are already exposed, not bolted on afterwards as an afterthought.
Combining insulation with a wider loft conversion or refurbishment reduces rework, controls moisture risk properly from the outset, and lets you bundle in other energy upgrades without paying for access twice.
Pro Tip: If you’re planning a loft conversion or extension in the next year or two, get your insulation strategy agreed before the build starts. Retrofitting it afterwards almost always costs more and disturbs finished work.
A contractor’s view on the mistakes we see most often
The most common mistake we see is homeowners insulating in isolation, tackling the loft one year, the walls the next, without ever mapping how air moves through the whole property. A joined-up plan, done once alongside other refurbishment work, consistently outperforms a patchwork approach. Tenenltd has worked on refurbishments and loft conversions across West and Central London since 2006, and the projects that perform best are the ones where insulation was designed in from day one, not added as an afterthought.
Where to read more on home insulation
For deeper reading, the Department of Energy’s insulation guidance and the ENERGY STAR DIY sealing guide cover material specifics and air-sealing technique in more depth. For a UK-specific checklist, see this property owner’s insulation guide, and check current government pages for energy efficiency scheme eligibility.
Ready to combine insulation with a wider refurbishment or loft conversion? Tenenltd has been managing renovation projects across West and Central London since 2006, integrating insulation and thermal boundary work into loft conversions and full refurbishments from the outset. Get in touch through our services page to discuss your project.
Frequently asked questions
What are the most effective home insulation tips for reducing bills quickly? Prioritise loft insulation, seal draughts around doors and windows, and insulate your hot water tank and pipes. These three steps typically deliver the fastest payback of any insulation work.
How deep should loft insulation be? Aim for the equivalent of R-30, roughly 10 to 13 inches depending on material. If your current depth is below that, topping up is almost always worthwhile.
Is cavity wall insulation right for every home? No. It suits homes with a genuine cavity and no existing damp issues, but properties exposed to driving rain or with damp history may be poor candidates. A survey should always come before installation.
Can adding insulation cause damp problems? Yes, if it’s installed without proper ventilation or vapour control. Interstitial condensation forms when warm, moist air meets a cold surface inside the wall or roof structure, particularly in basements and solid walls.
Should I get a professional energy assessment before insulating? For anything beyond a simple loft top-up, yes. A blower-door or thermographic survey identifies exactly where heat is escaping, so you don’t spend money insulating the wrong areas.
Sources
Recommended
Compression isn't the only way old insulation loses R-value. Settled or moisture-damaged material in an older loft often looks fine from above but has lost most of its loft depth where it matters, right at the eaves and low edges. Topping up over material that's already degraded just adds a layer on top of a problem instead of fixing it. We usually pulls the old batts first on anything more than about fifteen years old, since insulation removal and replacement tips ends up cheaper than a top-up that has to be redone in a few years anyway.