
Building extension checklist for West London homes
- luka bursac
- May 29
- 9 min read
TL;DR:
Planning a home extension without a detailed checklist often leads to costly delays and budget overruns in West London.
Key steps include confirming permitted development rights, serving party wall notices early, and securing all necessary surveys and approvals simultaneously.
Planning a building extension without a proper checklist is one of the most expensive mistakes a West London homeowner can make. Missed surveys, late planning applications, and poor trade coordination regularly push projects months over schedule and thousands over budget. The London Borough system adds further complexity, with conservation area restrictions, party wall obligations, and building regulations running as parallel processes that must all align before a single brick is laid. This guide gives you a practical, step-by-step building extension checklist tailored specifically to the realities of extending a home in West London.
Table of Contents
Key takeaways
Point | Details |
Permissions come first | Confirm whether permitted development applies or full planning permission is needed before any other planning steps. |
Budget for the unexpected | Set aside a contingency of at least 10–15% of your total budget to cover unforeseen structural or regulatory costs. |
Party wall notices take time | Serve party wall notices well ahead of your intended start date to avoid statutory delays affecting your schedule. |
Documentation protects you | Holding approved drawings, building regulations approvals, and signed contracts before work begins prevents disputes and inspection failures. |
Trade coordination is critical | Tracking hand-offs between structural work and internal fit-out phases is as important as managing the big milestones. |
Your building extension checklist: pre-planning essentials
Getting the pre-planning phase right is where most West London homeowners either save or lose significant time and money. Before your architect draws a single line, you need to understand what approvals govern your project.
Permitted development or full planning permission?
Permitted development rights allow many rear extensions without a formal planning application, but only if every size, height, location, and material rule is met. Missing a single condition means you need full planning permission. Think of it as a checklist of strict conditions rather than a blanket entitlement.
For 2026, the rules are specific. Single-storey rear extensions are permitted up to 3 metres deep on terraced and semi-detached properties and 4 metres on detached homes. Under the Larger Home Extension scheme, those limits stretch to 6 metres and 8 metres respectively, subject to neighbour consultation. Many streets in Fulham, Kensington, and Chelsea fall within conservation areas or are covered by Article 4 Directions, which remove permitted development rights entirely. Check with your local planning authority before assuming you qualify.
You can find a detailed breakdown of 2026 extension regulations to confirm which rules apply to your specific property.
Surveys you cannot skip
A pre-construction checklist for any UK home extension should include architectural drawings, structural calculations, planning permission, building regulations applications, party wall notices, key surveys, utility checks, contractor confirmations, quotes, insurance, site logistics, and neighbour notifications. Each one is a dependency, not an optional extra.
The surveys you need depend on your property type, but for most West London terraced and semi-detached homes, this means:
Structural survey: Confirms foundation capacity and load-bearing wall positions before your architect finalises the design.
Drainage survey: Identifies the route of existing drains, which often affects where your extension can be positioned.
Asbestos survey: Required for pre-2000 properties before any demolition or intrusive work begins.
Measured building survey: Produces an accurate floor plan from which your architect works.
Planning permission versus building regulations
These two are separate processes and both are required. Planning permission covers the appearance and impact of your extension on the surrounding area. Building regulations cover structural safety, fire protection, ventilation, insulation, drainage, and energy efficiency. You can have one approved without the other, which is why so many projects stall mid-build.
Pro Tip: Apply for building regulations approval at the same time as planning permission, not after. The two processes run in parallel and overlapping them can save you six to eight weeks.
Party wall agreements
If your extension shares a wall with a neighbour, or if you are digging foundations within three metres of their property, the Party Wall etc. Act 1996 applies. Party wall notices carry a statutory 14-day response window before work affecting shared walls or boundaries can proceed. In London terraced streets, this is one of the most common causes of project delays when it is left too late.
Approval type | Purpose | Typical lead time |
Permitted development confirmation | Confirms PD rights apply | 4–8 weeks (lawful development certificate) |
Full planning permission | Approval for design and impact | 8–13 weeks |
Building regulations | Structural and safety compliance | Ongoing throughout build |
Party wall agreement | Protects shared structures | Minimum 2 months before works |
Setting your budget and assembling your team
A realistic budget for a single-storey rear extension in West London typically falls between £2,500 and £3,500 per square metre, depending on specification, materials, and site conditions. That range shifts considerably once you factor in structural complications, ground conditions, or premium finishes. Always build in a contingency of at least 10 to 15 per cent. If you do not use it, you will be pleased. If you do need it, you will be very glad it was there.

When assembling your professional team, prioritise experience with West London properties specifically. Architects familiar with local planning authorities understand the unwritten expectations of conservation officers in Chelsea or the particular drainage sensitivities common in Hammersmith. For budgeting and planning guidance specific to this area, it is worth consulting an expert early.
The team you will need includes:
An architect or architectural designer to produce planning drawings and construction packages.
A structural engineer to design the steelwork, foundations, and load-bearing alterations.
A principal contractor who coordinates groundwork, superstructure, and fit-out trades.
A building control inspector from your local authority or an approved inspector.
Pro Tip: Ask every contractor for a fixed-price contract rather than a day-rate arrangement. Fixed-price contracts transfer the risk of minor delays and material price changes to the builder, not to you.
Clear scope documentation is non-negotiable. Every material specification, included fixture, and finish should be written into the contract before work begins. Vague scope is the single greatest driver of unexpected charges during a build.
The extension project timeline: site preparation and phasing
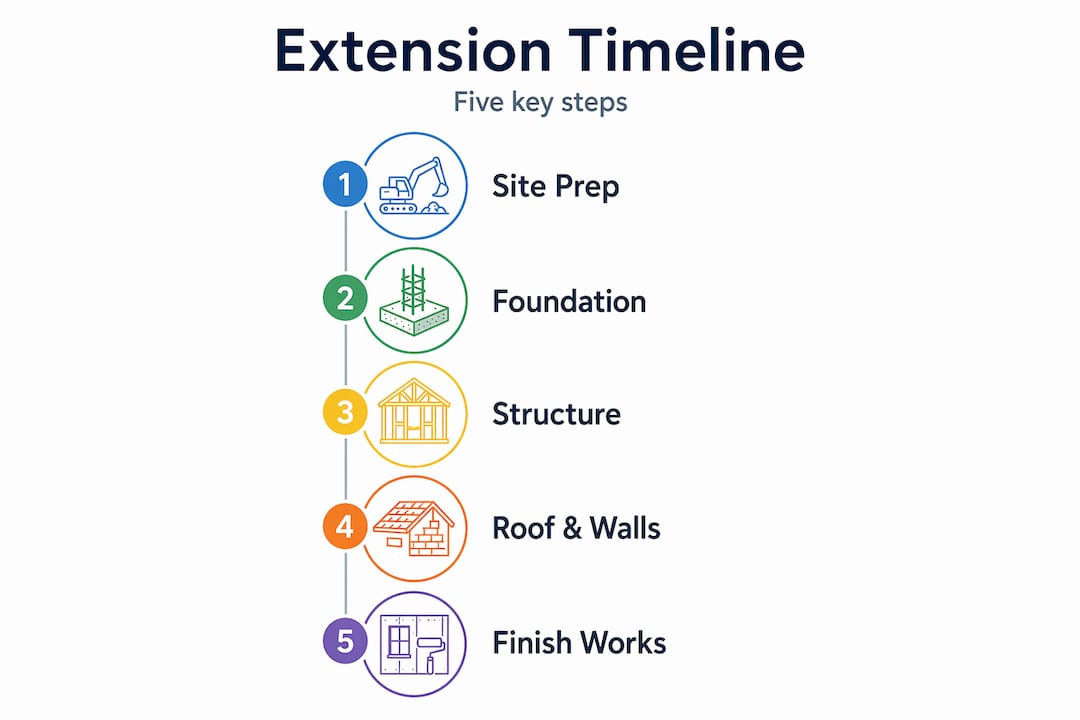
A typical single-storey rear extension follows a phased timeline that, when managed well, runs from groundwork to completion in approximately 14 to 16 weeks for a straightforward build. The weekly breakdown runs from groundwork in weeks one and two, progressing through superstructure, lintels, drains, walls, roof, windows and doors, first fix (electrics, plumbing, carpentry), and second fix (fitting and decoration) up to approximately week 14.
Before the build begins, work through the following preparation steps in order:
Confirm all utilities have been notified and any required diversions or upgrade works are scheduled well in advance.
Arrange temporary storage for furniture and belongings that will be displaced during construction.
Set up site safety provisions including hoarding, delivery access, and a waste disposal plan.
Confirm your party wall agreement is in place and the statutory response period has concluded.
Verify that your contractor holds current public liability insurance and that your home insurance policy covers an active construction site.
Schedule the building control officer’s initial site visit to coincide with the groundwork stage.
Pro Tip: Notify your utility providers (gas, electric, water) at least eight weeks before your planned start date. Upgrade or diversion work often takes longer than expected and can hold up an entire project if left until the last moment.
Weather and supplier availability both affect the schedule. Roofing and external brickwork are weather-sensitive, so builds that start in late autumn carry higher schedule risk. Inspections by building control must also be booked in advance; a missed or failed inspection can pause work for days.
Managing documentation and compliance
Building regulations inspections occur at critical stages: foundations, oversite and damp-proof course, first fix, and final inspection. Each stage must pass before the next begins. Failing to book an inspection at the right time, or starting work before the inspector has signed off a stage, creates compliance gaps that can be difficult and costly to resolve.
The documents you need to hold and verify throughout your build are:
Approved architectural drawings stamped by the local planning authority.
Building regulations approval notice confirming your application has been accepted.
Structural calculations prepared and signed by your structural engineer.
Party wall award (if applicable) documenting agreed working conditions with your neighbours.
Insurance certificates for both your contractor and your own property.
Signed contracts covering scope, payment schedule, and dispute resolution.
Using a document-control system centred on these approvals before site mobilisation substantially reduces the risk of disputes and inspection failures. A shared folder, even a simple one, where every document is version-controlled and accessible to your architect, contractor, and yourself, prevents the “I thought you had it” conversations that cause real delays.
Keep a written record of every site visit, decision, and material substitution made during the build. If a dispute arises after completion, this record is your strongest protection.
Common pitfalls and how to avoid them
Most delays in building extensions trace back to preparation gaps. Missed surveys, delayed party wall actions, and neglected utility approvals are the most common culprits.
The pitfalls worth knowing before you start:
Starting work before approvals are complete. Even small preparatory works can be deemed unauthorised if carried out before planning permission is formally granted.
Delaying utility notifications. Gas and electricity upgrades or diversions are managed by network operators on their own schedules.
Underestimating party wall lead time. The 14-day statutory response window is a minimum. Disputes or dissent from neighbours can extend the process to two months or more.
Vague contract scope. If a specification is not written down, it becomes a negotiation during the build, almost always at extra cost to you.
Poor trade coordination. Tracking hand-offs between structural work and internal fit-out matters as much as the big milestones. A plasterer who cannot start because first fix electrics are two days late creates a ripple effect across the remaining schedule.
“The homeowners who have the smoothest builds are not necessarily the ones with the largest budgets. They are the ones who asked every question early, got every document in order before work started, and maintained clear communication with their team throughout.”
Conduct a site visit at least once a week during construction. You do not need to be a builder to notice when work does not match the approved drawings or when a material substitution has been made without your agreement.
My perspective on West London extension projects
I have seen a pattern that repeats itself across extension projects in this part of London. Homeowners arrive with a clear vision and good intentions, then underestimate how much preparation the pre-construction phase actually demands. The checklist discipline this article describes is not bureaucratic caution. It is what separates a project that transforms your home on time from one that drags on for eighteen months and costs forty per cent more than planned.
In my experience, the two areas where most homeowners need the most support are party wall obligations and documentation control. Both feel abstract until something goes wrong, and by then the cost of getting them wrong is very real.
Budget flexibility matters too. I have never worked on a West London extension where the final cost matched the original estimate exactly. Ground conditions, structural surprises, and material lead times all introduce variation. The homeowners who plan for this are confident throughout. Those who expect the budget to hold rigidly to the penny find the process stressful.
My honest advice: engage your architect and your builder at the earliest possible stage, even before your budget is finalised. Their input shapes better decisions, not just better drawings.
— Mateja
How Tenenltd can help with your extension

Tenenltd has been delivering home extensions across West London since 2006. From rear extensions in Fulham to side-return projects in Chiswick and wrap-around builds in Notting Hill, the team handles every phase from planning coordination and structural work through to finishing and decoration. Regulatory compliance, trade scheduling, and quality control are built into every project from day one, so you are not left managing competing contractors alone.
If you are ready to move from planning to action, explore Tenenltd’s extension services to see the full range of rear, side, and wrap-around options available to West London homeowners. You can also browse the full services page for a complete picture of what the team offers. Getting in touch early means your project benefits from expert input before the decisions that are hardest to change have already been made.
FAQ
What permissions do I need for a building extension in West London?
Most extensions require either a lawful development certificate confirming permitted development rights or a full planning permission application, plus a separate building regulations approval. Properties in conservation areas across Kensington, Chelsea, and Fulham may need full planning permission even for smaller extensions.
How long does a single-storey extension take to build?
A typical single-storey rear extension takes approximately 14 to 16 weeks from groundwork to completion, though pre-construction approvals, surveys, and party wall agreements add several months to the overall project timeline before work starts on site.
When do I need a party wall agreement?
You need to serve party wall notices if your extension involves work on a shared wall, excavations within three metres of a neighbouring structure’s foundations, or new walls at or astride a boundary. The statutory 14-day response window means notices should be served at least two months before your intended start date.
What documents should I have before building work starts?
Before work begins on site, you should hold approved architectural drawings, your building regulations approval notice, structural calculations, a signed contract with your builder, insurance certificates, and a party wall award if applicable. This documentation protects you at every inspection stage and in any dispute.
How do I keep a building extension on budget?
Set a contingency of 10 to 15 per cent of your total project cost, agree a fixed-price contract with your builder, document every specification in writing before work starts, and conduct regular site visits to identify substitutions or scope changes before they become expensive corrections.
Recommended
Comments